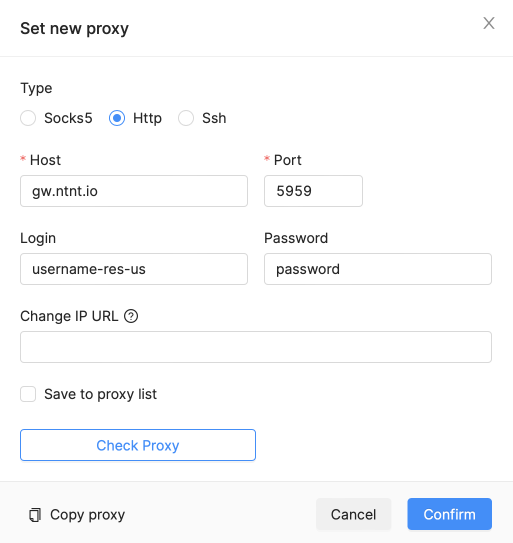
Adding NetNut proxies to Octo Browser
To add a proxy from NetNut to Octo Browser, go to the proxy adding menu in the Octo Browser Client, and
- Select the "HTTP" or "SOCKS5" protocol
- Paste "gw.ntnt.io" into the "Host" field for an "HTTP" proxy, or "gw-socks-am.ntnt.io" for a "SOCKS5" proxy.
- Paste "5959" into the "Port" field for an "HTTP" proxy, or "9595" for a "SOCKS5" proxy.
- In the "Login" field, provide the necessary data in the following format: username-(proxy-type=dc/res/stc)-сountry
Username is your login that you can find in your NetNut Account in Settings → Billing.
Proxy-type is the type of the proxy you use.
NetNut provides three different types of proxies that you choose depending on your NetNut subscription:
- dc: datacenter proxies;
- res: rotating residential proxies;
- stc: static resident proxies.
Country is the country whose IP addresses will be used. You can specify "Any," in which case any available country will be used, or enter an ISO country code of a specific country from the list of NetNut Available Countries. E.g., jp(Japan), fr(France).
Login field examples:
username-res-us
username-dc-any
username-stc-any
If you want the profile IP address to be static:
- Add "sid-number" to "login"
- This number should contain 5 to 8 digits.
IMPORTANT!
Choose digits randomly, not sequentially.
E.g., Username-res-us-sid-94731 (Login - rotating residential proxies - the USA - session identifier - session number).
- Enter the proxy password into the "Password" field.

If the pixelscan.net checker shows the notification saying that you are most likely using a proxy, please contact NetNut technical support using contact information on their official website.