Team settings
The Team settings section allows you to flexibly customize your work and distribute access rights among participants (the section is available for Team and Advanced subscriptions).
Team settings

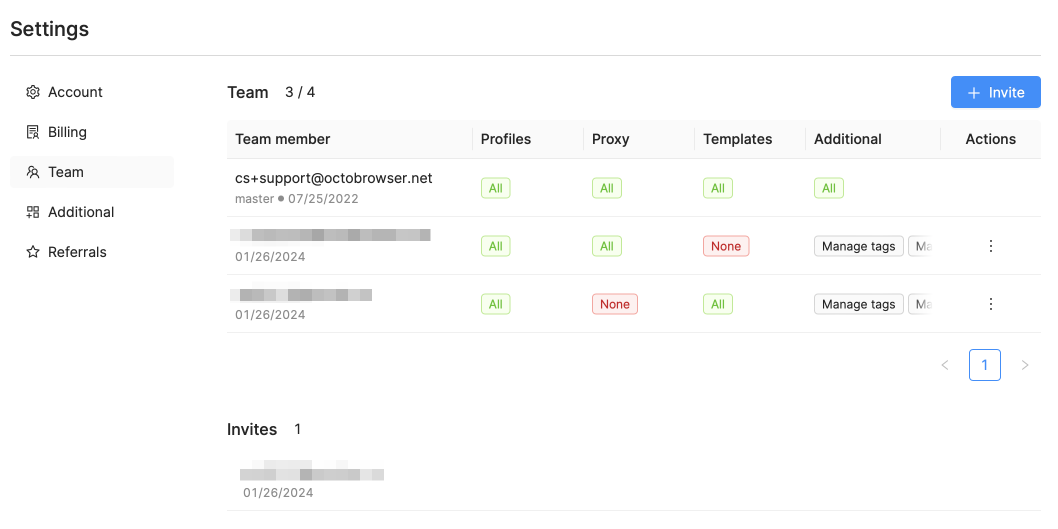
Team: this section displays information about active team members (the number of active team members / total number of available team members, user email, date of joining the team). The email of the main account owner is marked as master.
Invitations displays information about users who have been invited to the team, but have not confirmed their email yet (number of invited users, email, and the date the invitation was sent).
You can invite new members to the team, or remove existing members. You can also change access rights for profiles, templates, tags, proxies.
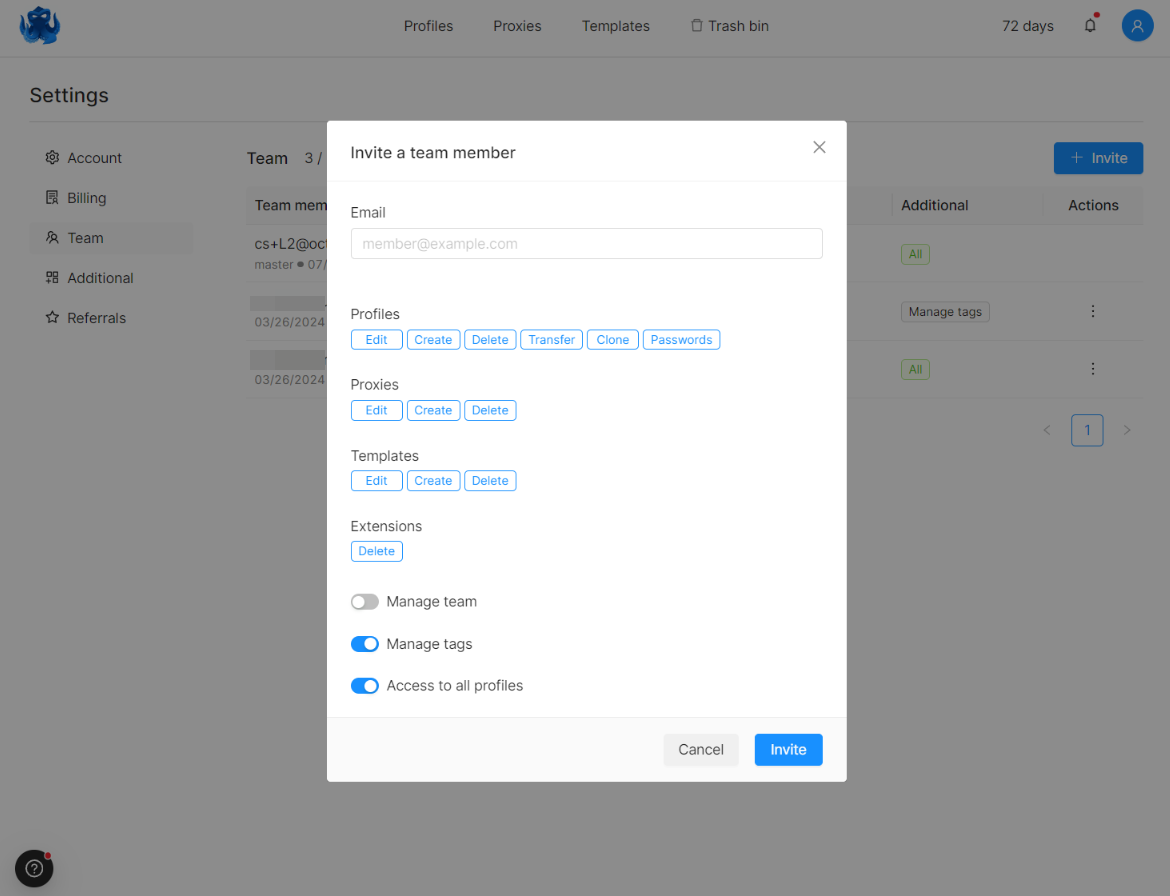
To invite a new member to the team, click the "Invite" button. In the pop-up window you can assign access rights to profiles and enter the email to which the invite will be sent.

Email is the field for the future team member email address. A message containing an activation link will be sent to the provided email address. After clicking on the link, another message containing a temporary password will be sent. The new team member can later change that password in the account settings. Invitations to new members can only be sent to new emails (ones that have not been used for an Octo Browser account registration before).
IMPORTANT!
If, when providing the email of a future team member, you see the notification "User already exists. The invite was not sent”, this means that the provided email address is already registered in Octo Browser. The team member's email must not have been previously registered.

To remove a team member, click on the recycle bin icon next to the email of the user you wish to remove. In the pop-up window, select "Confirm".
Profiles
In this section you can allocate access rights to functions affecting profiles. By default, all possible operations with profiles are enabled. You can turn off unnecessary ones by clicking on the corresponding buttons.
Creation enables the ability to create new profiles for a team member.
Edit enables the ability to edit available profiles and their data.
Delete enables the ability to delete available profiles.
Transfer enables the ability to transfer available profiles to another Octo Browser user.
Clone enables the ability to clone (copy) available profiles.
Passwords allows you to grant a team member the right to set and remove profile passwords.
Proxy
In this section you can allocate the necessary access rights for the proxy manager in your account (proxies that are saved to the list of proxies). This setting does not affect the ability of a user to add temporary proxies.
Create enables the ability to create and save proxies in the proxy manager. If this option is disabled, a team member will not be able to add proxies to the list when creating profiles or on the proxy list page, which means that they will be able to use only temporary proxies (proxies applied to a specific profile and not saved to the proxy list).
Edit enables the ability to edit proxies in the proxy manager.
Delete enables the ability to delete a proxy in the proxy manager.
Paid Proxies
In this section you can configure the necessary access rights for creating internal proxies.
Create enables the ability to create paid proxies.
Templates
In this section you can allocate the necessary access rights for managing templates in your account.
Create enables the ability to create profile templates.
Edit enables the ability to edit profile templates.
Delete enables the ability to delete profile templates.
Extensions
In this section you can assign the necessary access rights to manage extensions in the account.
Delete enables the ability to completely remove extensions from the list.
Tasks
In this section you can set the necessary access rights to manage tasks in the account.
View enables viewing available tasks.
Edit enables editing available tasks.
Team management
This is the most important key parameter. It should only be enabled for trusted team members. Enabling this allows a user you to fully manage the team and the access rights of all its members, and to add new team members.
Tag Management
Enabling this option allows a team member to make changes to tags for the entire team.
Access to all profiles
In this section you can allocate access rights to certain tags for a team member.
By default, access to all profiles is enabled. To allocate specific tag access rights, you must select the desired tags that the team member will have access to. Tags can be assigned when creating a profile. Learn more about setting up browser profiles here.
IMPORTANT!
Untagged profiles are available to all team members by default. Take this into account when assigning access rights within the team.
If multiple tags have been added to a profile, that profile will be visible to a team member who has been granted access to at least one of the added tags.
You can learn more about Team Management in our video tutorial:
Access to Action Log
This setting allows you to grant team members access to the Action Log. This option is disabled by default.
Access rights distribution using tags (example cases):
Each team member sees only their own profiles
You need to create and assign unique tags for each team member. Each team member selects their own tag when creating a profile; in this case only they and the main account will see these profiles.
For example (exact names and quantities are irrelevant in this example): Let's create for each team member their own tags: john for John, peter for Peter. Let's assign these tags to the team members accordingly. When creating a profile, John selects the john tag, and Peter selects peter. Thus, each of them sees only their own profiles.
Groups within a team see their profiles
You must create and assign unique tags for each team member and the corresponding stages. A team member at the initial stage of working with a profile must select their tag, and after completing work with the profile, add the tag of a team member who will continue with the next stage; or remove their tag, and add a team member tag to work on the next stage. In this case, the team member who completed the first stage will not see this profile futher.
For example (exact names and quantities are irrelevant in this example): Let's create tags group1 for group 1, group2 for group 2. Let's assign these tags to the team members, respectively. A member of each group selects their tag when creating profiles. Members of each group see their profiles.
Performing consecutive work within a team
You must create and assign unique tags for each team member and the corresponding stage. A team member at the initial stage of work with a profile must select their tag, and after completing work with the profile, add the tag of a team member who will continue with the next stage, or remove their tag, and add a team member tag to work on the next stage. In this case, the team member who performed the first stage will not see this profile.
For example (exact names and quantities are irrelevant in this example): Let's assign the farm tag to a farmer. The farmer creates a profile with the farm tag, farms the account, and then adds the buy tag to it (the buyer now sees the farmer's profile, and the farmer still sees this profile). Alternatively, the farmer removes the farm tag and sets the buy tag. In this case, only the buyer sees the profile.